I receive several calls each month from individuals who have
mules that will run away with them or will not stop when asked
to do so. Teaching a mule to stop when cued is essential to a
rider and mule’s safety.
The most effective exercise I’ve ever come across in teaching a
mule to stop on a dime is called “Hip, Shoulder, Shoulder.”
Essentially, we will be using our mule’s forward movement to
disengage his hind-quarters and then ask him to back up.
If we think about a stop, it really is a change of direction
from forward to backward. So, when teaching a better stop, we
don’t focus on the stop, we focus on the hip and backing up.
Anytime you increase your mule’s performance in one area, you
will find major improvement in several other areas. Some of the
exercises I teach are better taught from the ground first. By
starting on the ground, you will also be teaching your mule
better ground manners. Most importantly, starting on the ground
will make it easier for your mule to understand what you are
asking when you begin teaching him in the saddle. Other benefits
of doing ground work are that he will stand for you when you
mount, groom or saddle him, and so on. He will also be more
responsive to the bit and you will have your “emergency brake”
to get your mule back under control.
With that said, for “Hip, Shoulder, Shoulder,” we will begin on
the ground. Always begin any new lesson in a safe area, like a
round pen. You will need to have your mule bridled with a
snaffle bit. You will also need a dressage or long whip to cue
the hip to move.
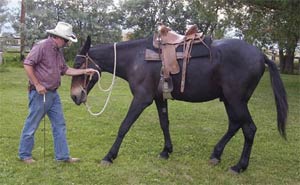
Step 1: Disengaging the Hip
 |
|
AFTER SEVERAL
repetitions, TIM is now beginning to see Diamond Creek
Grover cross his inside hind leg in front of his outside
hind leg |
The most important aspect of this exercise is your mule’s
forward movement. Your mule must have good and consistent
forward movement in order for this exercise to be successful.
To begin, position yourself facing your mule’s shoulder. Hold
the rein about four to six inches from the bit and ask your mule
to “go forward” around you by lightly tapping his hip with your
whip. You can find the lesson on teaching the “Go Forward” cue
in the July issue of Mules & More. Your mule should now be
moving around you consistently, without stopping.
While your mule is moving and you are positioned at his
shoulder, slowly move your hand with the rein toward the point
of his hip. Hold the rein toward the point of his hip until he
moves his hind feet away from you. Then release.
Remember… do not PULL or YANK the rein toward your mule’s hip,
you want to slowly take the slack out of the rein. If you pull
or yank, you are encouraging your mule to be heavy.
A few things that may happen…your mule may just stop and not
move his hips. Or, he may just take one step with his hips and
continue walking forward, or he may not move his hips at all.
However, be patient. When you pick up on the rein, you want your
mule to move his hips away from you.
When your mule begins moving his hips away from you more, he
will begin to cross his inside hind leg in front of his outside
hind leg. This means he is taking bigger and lighter steps with
his hips. He will also begin to get lighter on the bridle.
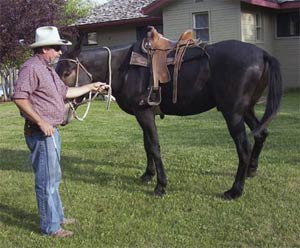
Step 2: The Inside Shoulder
|
 |
|
TIM IS NOW asking
“Diamond Creek Grover” to move his outside shoulder by
backing up and creating
a better stop |
Now we will take it a step further. As your mule’s hindquarters
start moving more consistently away from you and he is crossing
the inside hind leg in front of the outside hind leg, you will
then begin focusing on his front inside shoulder and foot.
Again, positioned at the shoulder, ask your mule to move forward
around you. You will use the same cue you just used to teach
your mule to cross his hind feet, but now you will be asking him
to do a little more.
As your mule is moving, take the slack out of your rein towards
the point of the hip. This time, hold the rein towards the hip
until your mule moves his hips away from you AND stops his
inside front foot. The second your mule stops his front foot,
release the rein.
Ultimately, you are looking for your mule to stop his inside
front foot and pivot on that same foot while moving his hips
away from you two steps.
Remember, when teaching a new or advanced maneuver, your mule is
going to take time to understand what you are looking for. So,
if your mule keeps walking around you and keeps moving his hips…
again, be patient and hold the rein towards his hip until he
stops his inside front foot. He may walk around you several
times before you figure out what you are looking for.
Repeat this portion of the exercise several times (100s or even
thousands) until he understands it completely. Also be sure to
teach the first two steps of this exercise on both sides of your
mule.
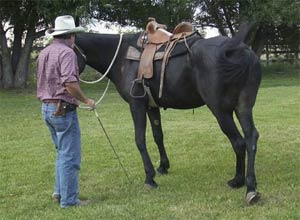
Step 3: The Outside Shoulder
 |
|
TIM IS TAKING the
slack out of the rein towards the point of Diamond Creek
Grover’s hip. Grover will then disengage his hip |
So, now that you have your mule disengaging his hips and
pivoting on this front inside foot we are going to teach the
outside front shoulder to get light and give us that stop we’ve
been looking for. Remember, a true stop is really a change in
direction.
Now, repeat steps one and two. Immediately after your mule has
moved his two steps away from you and has pivoted on the inside
front foot, take your rein towards the point of his inside front
shoulder and hold. As you hold, your mule will begin to rock
backward and eventually take one step backwards. Then release.
Gradually, you will get two, then three then five then 10 steps
backwards. Repeat this exercise several times and you will
eventually have your mule “running” backwards.
Once in the saddle, you will repeat steps one, two and three
exactly as you did on the ground.
Over time, your mule will begin to understand exactly what you
are looking for. Your mule will understand that as soon as you
pick up a rein, you are going to want him to back up, which in
our mind means STOP.
This exercise will also teach your mule to use his hind-end
better. He will round his back and lift his withers and be
lighter in the front end.
I have received many calls about conducting clinics throughout
the United States. You may now go to my website
www.diamondcreekmules.com and click on training. There you will
find information on how to host a clinic in your area. I am now
booking clinics for November and December of 2009 and January
thru April of 2010.
You can also go to my website and view a short video of the
three steps of this exercise I’ve just explained to you. I hope
you enjoy it and I hope to see you at a clinic soon.
Tim can be reached at
www.diamondcreekmules.com, or by phone at 307/899-1089, or
email:
bliss@wavecom.net.
|