 |
|
Make sure your mule responds to the
“Come to You”
cue before you begin |
I receive a lot
of calls from mule owners who have mules they can not catch.
This can be very frustrating. The first step in training
your mule to be caught is to teach your mule to come to you
on cue. See the November 2009 issue of Mules and More
magazine or visit my web site
www.diamondcreekmules.com for instructions on teaching
the “Come to You” cue.
The “Come to You” lesson is important because you are
teaching your mule a cue that you will need during your
“catching” lesson.
Always remember, any training lesson can be ended at any
time. You do not have to teach your mule the entire lesson
all at once. You may stop at any time as long as your mule
is calm and has responded correctly to a cue you have given
him.
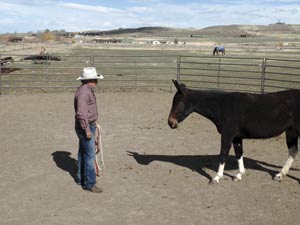
After your mule
will come to you in a given area, you are ready to move to
the next step. You will need your halter and lead rope,
which to most mules, signifies that he will be caught for
some reason.
 |
|
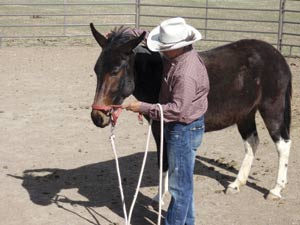
Teach your mule to stand calmly and
accept the halter. |
Walk towards your
mule with your halter and lead rope. Let’s say you are 30
feet from your mule when you start walking towards him. If
you think your mule will walk away from you when you are 20
feet from him, then you need to turn around and walk
directly away from him at 21 feet. In other words, you leave
before your mule does.
Now, I am sure you are scratching your head…but, the key is
to turn around and walk away from your mule before he moves
away from you. When you move away from your mule before he
leaves you, you are giving him a release.
In any training lesson we do, the release is what your mule
looks for and learns from. If we chase him all over the
pasture until he is caught, he will keep running because we
have not given him a release, so he is thinking, run, run,
run. If we give a release before he moves, then he will
begin to change his thinking and say, “OK… I will stay.”
When you begin walking up to a hard to catch mule, he is
probably thinking, “Oh no, what does he want.” At this
point, your mule is getting emotional and becoming nervous
or uncertain about what you want.
 |
|
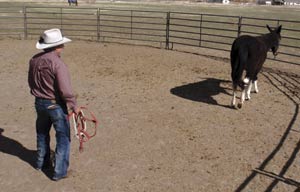
If your mule walks away, you are
going too fast.
|
If you turn and
walk away before your mule does, you are teaching him to not
be afraid. You are teaching your mule to think, “Is that all
he wanted? I did not need to be afraid.”
The timing of your release is what makes the difference in
your training. For this lesson, if the mule moves away
before you gave your mule a release, you have gone to close.
If the mule does move away, ask the mule to “Come to You.”
Next time, make sure you walk away sooner.
After you walk away, turn and face your mule again and
repeat the process. Begin walking towards him again and just
before you think he will move, walk away and give your mule
a release.
Over time, walk and release closer and closer to your mule,
until you are standing one foot in front of your mule.
Now you are ready for step three. When you are within a few
feet of your mule consistently, you are still going to walk
away, but instead of walking directly away from your mule,
walk at a 45 degree angle away from your mule’s head in the
direction of his hip.
Repeat step three
several times until your mule starts turning and facing
you…and eventually following you. We are halfway there.
 |
|
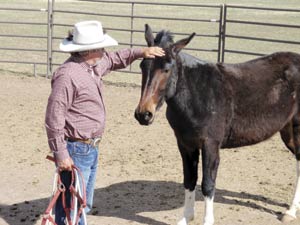
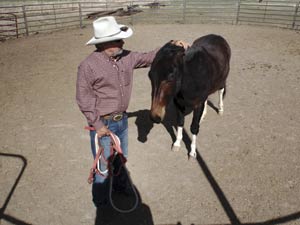
TIM
starts sacking out Silky with his hand.
|
Next, turn and
pet your mule and praise him. While you are praising him,
use this opportunity to “sack out” your mule with your
hands. Rub him all over with your hands. Do not use the lead
rope to sack your mule out yet. Not until your mule is
totally relaxed. Be sure to hold the halter and lead rope in
the opposite hand that you will “sack out” your mule with.
Note, if your mule is moving away from your hands while you
are sacking out your mule, you are moving your hands too
slowly or keeping them on his body too long. He is telling
you he is sensitive to your hands and afraid. He is looking
for a quicker release. In this case, touch him for just a
second and take your hand away. Build up to five or ten
seconds and so on.
Keep sacking out your mule with your hand building on
keeping your hand on his head, ears and pole longer and
longer. If your mule does not like his ears touched, start
on his forehead and swipe your hand over them very quickly.
You want to go so quickly that he reacts to your touch after
you have already touched his ears. Remember, you can
gradually go slower the more comfortable he gets. You can
tell he is getting more comfortable because he is reacting
less.
 |
|
Make
sure you sack out your mule’s entire head, including
the ears.
|
Work your hand
down his head, to his neck and finally to his front
shoulders. This will take many repetitions. Make sure you
release your mule, take your hand away, each time you touch
him.
The next step is to sack out your mule with the halter and
lead rope. Repeat the same process you used with your hand.
Start by touching him for a second with the halter, then
taking it away. By this time, your mule will be used to
seeing the halter since you had the halter in your hand as
you sacked him out with your hand.
Work slow building on each step. If the mule moves away you
have gone too far. Ask the mule to come to you and start
again.
If he reacts or moves away each time you try to touch him,
back up. You may have to start by raising the halter and
lead rope up in the air six inches, then lowering it.
Sack the mule with the halter and lead rope until your mule
will stand while you place the halter on your mule. You have
just trained your hard to catch mule to be caught.
Congratulations!